Tuesday, August 25, 2015

Installing and Configuring vRealize Operations Manager 6.0 (vROM) AKA vCenter Operations Manager

I am deploying vRealize Operations Manager 6.0 which is completely different from all its previous versions. The configuration is completely changed, looks very simple and light. I am setting up single vROM, meaning the master node must also perform data collection and analysis because it is the sole node, and the only place where vRealize Operations Manager adapters are installed. For distributed or multi-node  installation those roles could designated to different nodes.

  1. Master Node: Required node in the cluster which performs all the actions.
  2. Data Node: (Optional) - which has adapters installed to perform collection and analysis. Suitable for larger Deployments.
  3. Replica Node: (Optional) - Replica of Master Node for High Availability. Suitable for larger Deployments.
  1. Remote Collector Node: (Optional) - Distributed deployments might require a remote collector node that can navigate firewalls, interface with a remote data source. Only gathers objects for inventory and doesn’t store or perform any analysis. Suitable for Distributed Installation.

vROM sizing calculator could be found here
kb.vmware.com/kb/2093783

vROM could be installed and configured on

  1. As an Vmware Appliance (From vCenter not through ESXi Host)
  1. Windows Operating System
  1. Linux Operation System.

Check the below guide for installing on Windows or Linux Operating System, I am deploying as an Appliance using .ova file.

Deploy the vROM Appliance:

  1. Connect to vCenter Server, click on File and select deploy from OVF Template and locate the ova file and select next.
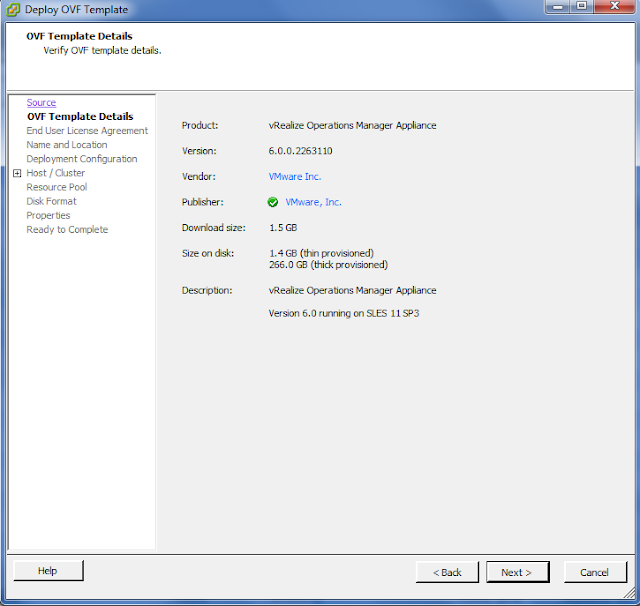
  2.  Accept the License and give the name for vRealize Operations Manager Appliance.  Select the appropriate Cluster, Host and Datastore.
  3. Select the appropriate deployment Configuration and complete the wizard to start the deployment.
  4. Select appropriate Network Mapping and complete the network configuration details. It is always static IP for Master and Replica Node.

Additional nodes as mentioned above could be deployed following the same above steps. I am setting up this solution for smaller environment so I would only use single Master Node.

Master Node Configuration:


  1. Enter the FQDN or IP of the appliance in browser. You are presented with 3 options as mentioned below, the getting started tab for each of the option has very nice flow diagram which gives you a high level idea how its going to work

  1. Express Installation
  1. New Installation
  2. Expand Existing Installation

I am going with the New Installation, so I would be creating a new vRealize Operations Manager cluster with this node as the master node. 

  1. Set the Administrator Password and click on Next.
  2. I am using the default certificates which came with vROM. If you have server certificate of your own to be used for secure communication, you may upload here.
  3. Enter the name for Master Node and NTP server details. Click on Next and then Finish to complete the configuration.
  4. Now you can add more nodes or enable services for data collection on master node.

Import Data from Existing vCenter Operations Manager or Configure to collect data from environment


Existing vCenter Operations Manager can be imported to new deployment and when you turn off the earlier deployment, monitoring of the inventory and data is done solely by the new version of vRealize Operations Manager.

  1. I would choose "New Environment" option to monitor my other solutions.

This how it goes if you choose "Import Environment" option.

  1. Accept the License Agreement, enter the License Key and Click on Finish to complete the configuration.

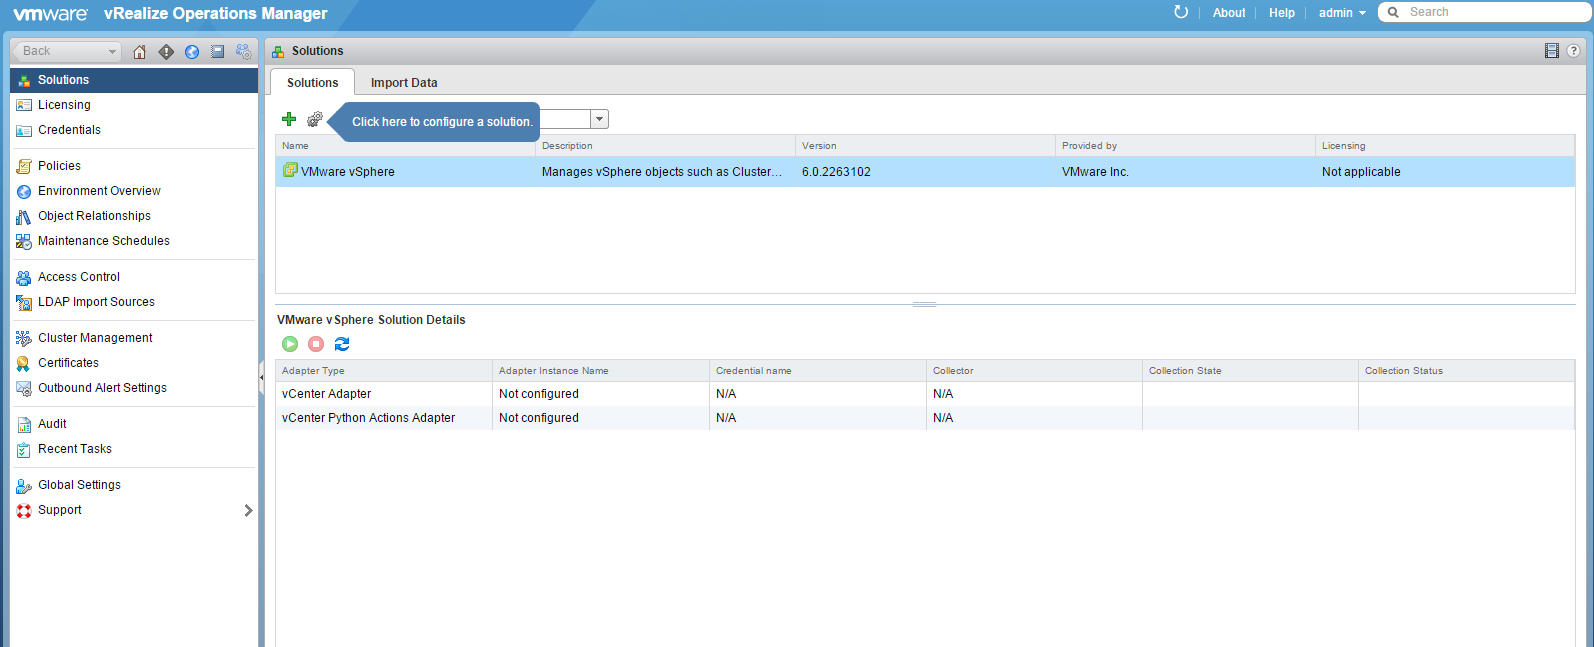
Add Solutions to be managed by vRealize Operations Manager


  1. Click on Solutions, and then Configure. I'm adding 2 vCenter details here.
  2. IN the next step you define what all needs to monitored, I am going with all default options.
  3. Click on Finish to complete the configuration.

It would take some time to collect the performance Data from added vCenter Server. This concludes the configuration, the new version of Operations Manager is smooth and works like a charm. You just need one 1 IP to setup the Single Node environment, I hope this post was informative. 

Monday, August 24, 2015

Prepare Linux 6.5 (RHEL) Template for vRealize Automation Application Services (Application Director)

Regular vSphere Template cannot be directly used in vRealize Application Services, we need to install the agent and prepare it for to be used with Application Services. In this post, I am using RHEL 6.5, the steps would remain same for other flavours of linux

  1. Prepare a Linux VM, I am using RHEL 6.5. Login with root.
  1. Download the installer script http://Application_Services_Server_IP/tools/preparevCACTemplate.sh to the Linux machine. You can use the wget or scp commands to download the file.
  1. Ensure that the installer script has permission to execute.
chmod +x ./preparevCACTemplate.sh
  1. Run the installer script.
./preparevCACTemplate.sh
  1. Enter the vRealize Automation Appliance Host Name or IP
  2. Enter the IaaS  Manager Services Server Hostname or IP
  1. Enter the Application Services Server Hostname or IP
  1. Next prompt is to Check Certificate and Download & Install Java Runtime Environment 1.7.0_72

Make sure you get the confirmation
#######################################
# Installation Completed Successfully                  #
# Ready to capture as a template                         #
#######################################
  1. Make sure if the Application Director agent service is available
 rpm -qa | grep -i appd
vmware-appdirector-agent-service-vcac-6.0.0.0-0.x86_64

  1. Shut down the Linux virtual machine.

For this VM to be added as Template on Application Services (Application Director), we need to publish this as Blueprint from vRealize Automation (vCAC). You could use the Full Clone or Linked Clone method in the Blueprint. I am using Linked Clone to save storage and time.

  1. Take a snapshot of this VM and give the name & description appropriate.
  2. Connect to your vRealize Automation console and got to Infrastructure>>Blueprints and enter respective information.
  3. Under Build Information, Select "Linked Clone" for Action and select the snapshot of respective VM from "Clone From" option. Rest of the options are self explainatory.
  4. Now hover the mouse over Blueprint name and click on Publish.
  5. Now go to Infrastructure>>Compute Resources, Hover the mouse on respective vCenter(Endpoint) and click on Data Collection. Click Request Now for Inventory, State and Performance.

This will make this template available for vRealize Automation Services (Application Director)

Sunday, August 23, 2015

Install and Configure vRealize Application Services 6.2

Deploy vRealize Application Services 6.2 (Application Director)

Before you deploy the Application Services appliance, make sure you have created the IP Pool at the Datacenter level and associated the right Network Pool. The deployment of Application Services is the same OVA deployment, input all the required information and your Application Services appliance deployed in few minutes. Once the Appliance is successfully deployed follow the below steps to complete the configuration

Configuring vRealize Application Services after Deployment

  1. While it is booting, it would prompt for the Serial Number (license). Enter the Serial Number and press Enter.
  2. Prompted for "root" paasword.
  1. Next prompt is for "Darwin_User". Remember, When you are prompted for this password again, you have only three attempts to type the correct password.
  1. Here you can enable ssh services by typing "yes" to the prompt.
  1. Now you are prompted to enter the vRA or vCAC url.
  2. Now enter System Administrator Username, i.e., administrator@vsphere.local and enter the password when prompted. It would start the registering process.
  3. Wait till you get the "vCAC server registered successfully" message.
  4. Next prompt is to set up Out-Of-Box sample content , select "y" and press enter.
  5. Now enter the Tenant details, make sure the tenant user mentioned has the application services role in order to import the sample contents.
  1. Enter the Business Group details, the Business group has space in it then enclose the entire name in double quotes.
  1. At this stage it would import the out-Of-Box sample contents to added tenant. Wait till you get the "import successful" message.  Press any key to continue
  1. In the last step you are logged in as admin and prompted to enter the new password. Enter the password and that concludes deployment of vCloud Application Services 6.2.


Configurations on vRealize Application Services 6.2

  1. Connect the Application Services portal by going to https://ip_or_fqdn_of_appd:8443/darwin/org/tenant_name
  1. Enter the Tenant username and password to login, the user who has application services privileges.
  1. Click on Application drop down and select "Cloud Providers"
  1. New Cloud Provider: Application Services registers a cloud provider by connecting to a vRealize Automation business group.  Click on the Green Plus and Fill in the details. I am using vCAC as the Cloud Provider here, vCloud and EC2 are the other supported options. The username and password is the Business Group Manager credentials for the respective Business Group selected. Click on "Validate Connection" and then save after successful validation.

Add Template: Template would be the IaaS VM, required to deploy application and services through Application Services. I have created a Linux Blueprint with Linked Clone with vCAC guest agent and AppD agent installed. See Prepare RHEL Template for Application Services here.
Click on the Green Plus next to Template and select the Blueprint published for this purpose.

  1. Create a Deployment Environment: You can map a deployment environment to a vRealize Automation reservation policy before you deploy applications to that cloud environment. If you do not select a reservation policy, vRealize Automation picks any suitable reservation policy at deployment time.
Click on the Green Plus and fill in the details. Select the Reservation policy, (in vCAC >> Infrastructure>>Reservation>>Reservation Policy) and click on Save.


Now you are ready for the Application Deployments, I would share post on Application Deployment soon. Hope this post was informative.