Monday, December 29, 2014

vCAC 6.x Error: "HTTP Error 503. The service is unavailable" under the Infrastructure tab

Recently after a network outage in my lab, all my machines were restarted. I started getting the service not available messages everywhere under the Infrastructure tab, when I brought my vCAC infrastructure online. I am documenting the steps I followed to fix this issue, you may jump to the final resolution part. I hope these troubleshooting steps would certainly help for other similar issues.

Issue: Any selection under Infrastructure tab show error- HTTP Error 503. The service is unavailable.

Catalina.out log @ /var/log/vcac/ on vCAC Server shows below errors

2014-12-28 01:36:00,036 vcac: [component="cafe:component-registry" priority="WARN" thread="mainTaskExecutor-48" tenant=""] com.vmware.vcac.platform.rest.RestTemplateIpv6.handleResponseError:581 - GET request for "https://lab-vcac-iaas.ps.local/WAPI/api/status" resulted in 503 (Service Unavailable); invoking error handler
2014-12-28 01:38:00,044 vcac: [component="cafe:component-registry" priority="WARN" thread="mainTaskExecutor-44" tenant=""] com.vmware.vcac.platform.rest.RestTemplateIpv6.handleResponseError:581 - GET request for "https://lab-vcac-iaas.ps.local/WAPI/api/status" resulted in 503 (Service Unavailable); invoking error handler
2014-12-28 01:40:00,046 vcac: [component="cafe:component-registry" priority="WARN" thread="mainTaskExecutor-35" tenant=""] com.vmware.vcac.platform.rest.RestTemplateIpv6.handleResponseError:581 - GET request for "https://lab-vcac-iaas.ps.local/WAPI/api/status" resulted in 503 (Service Unavailable); invoking error handler
2014-12-28 01:42:00,045 vcac: [component="cafe:component-registry" priority="WARN" thread="mainTaskExecutor-31" tenant=""] com.vmware.vcac.platform.rest.RestTemplateIpv6.handleResponseError:581 - GET request for "https://lab-vcac-iaas.ps.local/WAPI/api/status" resulted in 503 (Service Unavailable); invoking error handler
2014-12-28 01:44:00,109 vcac: [component="cafe:component-registry" priority="WARN" thread="mainTaskExecutor-50" tenant=""] com.vmware.vcac.platform.rest.RestTemplateIpv6.handleResponseError:581 - GET request for "https://lab-vcac-iaas.ps.local/WAPI/api/status" resulted in 503 (Service Unavailable); invoking error handler
2014-12-28 01:46:00,029 vcac: [component="cafe:component-registry" priority="WARN" thread="mainTaskExecutor-38" tenant=""] com.vmware.vcac.platform.rest.RestTemplateIpv6.handleResponseError:581 - GET request for "https://lab-vcac-iaas.ps.local/WAPI/api/status" resulted in 503 (Service Unavailable); invoking error handler
2014-12-28 01:48:00,044 vcac: [component="cafe:component-registry" priority="WARN" thread="mainTaskExecutor-47" tenant=""] com.vmware.vcac.platform.rest.RestTemplateIpv6.handleResponseError:581 - GET request for "https://lab-vcac-iaas.ps.local/WAPI/api/status" resulted in 503 (Service Unavailable); invoking error handler

Possible Resolutions:

I am listing out the steps I followed to fix this issue, maybe any of the below step might your issue as well.
  
  1. Make sure all the vCAC services are up on IaaS Server by going to services.msc.
  2. Make sure the vcac server service is running on vCAC appliance. Confirm it by running
service vcac-server status

If it is stopped, then start or restart it by below command
service vcac-server start

  1. Microsoft Hotfix for Server 2008 R2 which could help in case if vCenter server is throwing the above error (refer Vmware KB - kb.vmware.com/kb/2033822)

  1. Make sure all the services in IaaS are running with the same account or maybe local system account if appropriate.

Below is the step which worked in my case

  1. Open - Internet Information Services (IIS) Manager and Select the Application Pool under the root node.
  1. Make sure the DefaultAppPool service is running. Try restarting if it is still running.
  1. If this doesn’t resolve the issue then make sure these services associated with vCAC are running with the same account as in services.msc
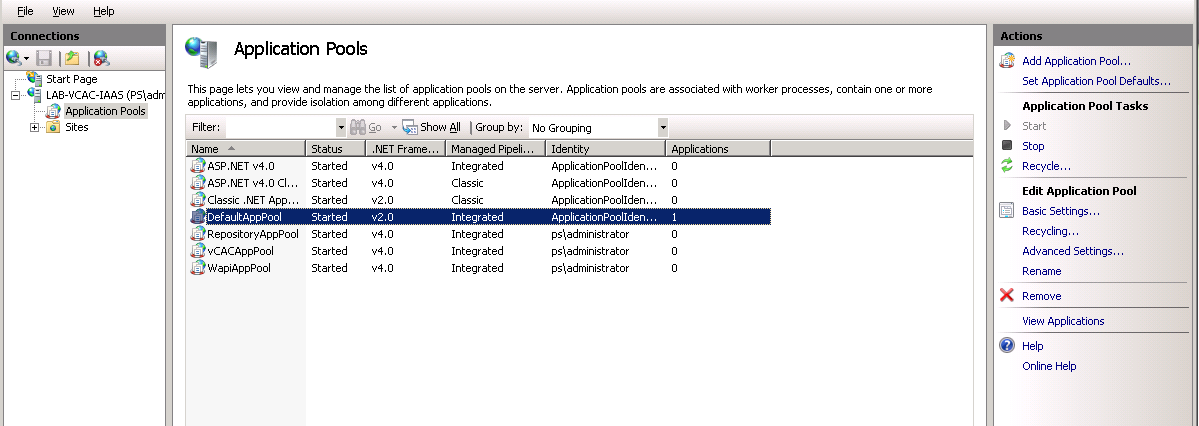
  1. RepositoryAppPool
  2. vCACAppPool
  3. WapiAppPool

In my case the above 3 services were stopped. After starting these services, everything was back to normal. 

Thursday, November 13, 2014

Log in securely to a vCAC server using command Line Interface (vcac-cli)

With vcac-cli you can do the same stuff what would be doing from vCAC Console, you may request machine from catalog, re-provision a machine, view request and more.  There are 3 different modes,

  1. Interactive Mode

  1. Command Line Mode :
The command line mode lets you incorporate vcac-cli commands in other scripts and programs.

  1. CLI Script Mode
The CLI Script mode is similar to the command line mode, except that you can invoke multiple commands in sequence.

There are 2 prerequisites to install vCAC-CLI

  • Your machine must have Java SE Development Kit (JDK) 7 installed and running.
  • Your PATH environment variable must include the location of the correct version of Java.

Steps:

  1. Open a browser and enter the vCAC appliance name or IP.
  2. Download the command-line interface (vcac-cli) distribution package.
  3. After extracting, you would get 3 folders, i.e., BIN, ETC and REPO.
  4. Open the BIN and there would be 3 files. (spring-shell keeps the history of commands run)
  5. Right click on vcac-cli (batch file) and click on run as Administrator, that should log you in to vCAC cli utility.

To open a secure connection to your respective vCAC server, follow below steps:

Syntax -  " login --sessionid, --url, --user, --password, --tenant "

I used the below command to connect to my default tenant (vsphere.local), even if you omit the --tenant it will log in to the default Tenant.

 login --sessionid 01 --url https://lab-vcac-server.ps.local --user administrator@vsphere.local  --tenant vsphere.local

It will prompt for the password, enter the password for the entered user and make sure you get the "login successful" message.

Now you are connected to your vCAC server and you may perform all steps which could do from console.

Sample commands:

Type "rest get --service authentication --uri tenants" to get the list of tenants

To see the running services, just type "services"


I hope this post was informative. 

Tuesday, November 11, 2014

Add vCloud Director 5.5 as an Endpoint to vCAC 6.1

vCloud Director can be added as an Endpoint to vCloud Automation Center and the vApps can be provisioned through vCAC to the Organization vDC. Addition to vApp provisioning  you may also add customer workflows or customer properties during different stages of vApp provisioning.  vApp is a container for its component machines and is not a machine itself, so vApp is not counted as a machine in reports or licensing. Before adding vCloud Director as endpoint, make sure that you at least have one organization, vApps and vApp templates.

Note: If you create a vCloud Director endpoint, then do not create an another endpoint (vSphere) for its underlying vSphere resources. As the vCloud Director gets the resources (CPU, Memory and Storage) from underlying vSphere.

Data Collection: vCAC uses vSphere proxy Agent to communicate to vSphere resource, so it doesn’t require separate agent for vCloud.

Procedure:

  1. Login to vCAC as IaaS Administrator.
  2. Select Infrastructure > Endpoints > Endpoints.
  3. Select New Endpoint > Cloud > vApp (vCloud Director).
  4. Give an appropriate name for vCloud Endpoint and description. The vCD address should start with "https" fqdn or ip.
  1. Add Credentials: Add the user which had Administrator role in the respective Organization. You can add endpoints for each additional organization in the vCloud Director instance to integrate with vCloud Automation Center.
  1. Type the name of the Organization (it is case sensitive).
  1. Click on OK. (Add custom property -optional).

 Note:  To allow access to all organization vDCs in the vCloud Director instance, use system administrator credentials for a vCloud Director and leave the Organization text box empty.

Confirm the Data Collection Status:

  1. Hover the mouse on vCloud Endpoint name and click on "Data Collection".
  1. Click on "Start" and wait till you get the "succeeded" message. This confirms the agent is communicating with the Endpoint.


This concludes adding vCloud Director as Endpoint to vCAC. Next create Reservation on Fabric Group and associate it with a Business Group, those resources would be used for vApps provisioned.

Monday, October 27, 2014

Reset vCenter Orchestrator Appliance Configuration Password

I have multiple instance of vCenter Orchestrators running in my vCAC setup as endpoints including the default one.  During first time configuration I created different passwords due to the fact that the default vCO (which comes with vCAC) password requires at least one uppercase and this restriction isn't there with the vCO Appliance. So, I had two different passwords for my two vCO's and after couple of days I messed up with my passwords and ended up locking both the vCO configuration logins.

Later on, I started getting the below error even after entering correct password. Tried on different browsers and multiple sessions.
Login failed: User/password mismatch or account temporarily blocked after too many unsuccessful attempts

Issue: After entering wrong password for multiple times on vCenter Server Orchestrator Configuration login page, the login is blocked for uncertain time interval and you receive the below error.

Resolution:

  1. Login to the vCO appliance with the root password. I usually take a putty session as it is more quick and easy to use.
  1. Type: # cd /etc/vco/configuration/ and hit enter.
  1. List the directory by typing "ls" and backup the file "passwd.properties". I used below command
cp passwd.properties passwd.properties.oldpass
  1. Type " vi passwd.properties" (Press Insert) and clear everything, in my case the line starting from "vmware=SHA…… .. .. \=\=" which was my old password.
  1. Now type the default password by adding the below line without any changes and save the file. (Press ESC and :wq to save)
vmware=92963abd36c896b93a36b8e296ff3387
  1. Restart the vCO configuration services by typing the below command
service vco-configurator restart
  1. After couple of minutes this should take effect and you should be able to login with the default username and password for configuration login which is
Username: vmware
Password: vmware
  1. After successful login, you are prompted to create a new password with at least one upper-case alphabet (if vCAC 's default vCO).

The above steps should work but sometimes it might take a long time to take effect after resetting the password. Here is what I did for immediate login, even you may try only if you remember your old password and if you can't wait

Follow the steps from 1-6 and again rename the file "passwd.properties.oldpass" as "passwd.properties" and restart the vCO configurator service. You are making the old password file active and don’t forget to rename the file created for default password.

I hope the above information is helpful.


Tuesday, October 21, 2014

Associate a vCenter Orchestrator Endpoint with a Blueprint in vCAC 6.1

vCAC uses vCO Endpoints to run workflows. We can configure multiple vCO Endpoints and configure priority on it, where 1 is the highest priority. While executing the vCO workflows, vCAC connects to the highest priority vCO Endpoint and if it is not available then it goes to the  next priority vCO endpoint. We can also associate particular vCO endpoint with a blueprint, so that whenever any VM is provisioned through that Blueprint, it will always use the associated vCO Endpoint. 

I have 2 vCO Endpoints added to the vCAC, vCO is the default one and vCO01 is external.

This post will demonstrate how to associate an existing Blueprint with vCO Endpoint.

  1. Login to vCAC as Tenant Administrator or Business Group Manager.
  1. Go to Infrastructure >> Blueprints >> Blueprints.
  1. I would be editing the existing Blueprint, the steps remain same if creating a new Blueprint. I am using the Blueprint created for Provisioning Linked Clone  VMs.
  1. Click on Properties Tab and click on New Property.
  1. Type VMware.VCenterOrchestrator.EndpointName in the Name text box.
  1. Type the name of  vCO Endpoint in the Value text box. In my case vCO01 is set to Priority 2.
  1. Click on Green Check mark and click on OK.


Tuesday, October 7, 2014

vCAC 6.1: Error : The vCloud Automation Center console is not supported for Internet Explorer in compatibility mode.

Issue: During the configuration of vCloud Automation Center Server, when you try to connect to the vCloud Automation Center console at "https://vcac-hostname.domain.name/vcac" on Internet Explorer 8 or higher you receive the below error

"The vCloud Automation Center console is not supported for Internet Explorer in compatibility mode"

Documentation: Below is the snipped of vCloud Automation Center 6.1 Installation and Configuration Guide where it clearly say:

Link: http://goo.gl/LZ5sP7

Keep in mind vCloud Automation Center requirements when choosing a browser to use with vCloud Automation Center.
 

As per the documentation, if you set the browser mode to Internet Explorer 7

Steps:

  1. Press F12 or Click on Tools and select Developers Tools.
  2. Select Browser Mode as IE7.
  3. The vCAC console page automatically refreshes. Login with the SSO credentials.
  4. Now it throws a new error message, which contradicts with recommendation provided in the above documentation.

Solution:
  1. Now Press F12 again and select Browser Mode as IE8, not the IE 8 compatibility View.

  1. The page automatically refreshes and logs you in the vCAC Console.


Input by +Sawab Ahmed 

In some cases there might be some AD Group policies set which might restrict a user access to F12/Developer options.
You may Perform the following in those cases:

1. Navigate to Tools --> Compatibility View Settings.
2. Uncheck the option "Display intranet sites in Compatibility View" and "Display all websites in Compatibility View"
3. Restart the Internet Explorer and you shouldnot get the warning anymore.

Monday, September 29, 2014

Installing vCenter Orchestrator Plugin (EMC ViPR)

Plug-ins helps to connect vCenter Orchestrator to the external technologies and applications. It lets you automate the access, control and management. There are lots of plug-ins which comes along with the vCenter Orchestrator Appliance and 3rd-Party plug-ins could be installed to work with vCO. 


You may see those plugin by going to below address and click on plug-ins tab


You may add third party plugins from the same console. For example, when you have vCenter Operations Manager or Vmware Horizon Suite 6 in your environment and if you wish to automate and manage those products using vCenter Orchestrator then you just need to download the respective vCO plugin and update it. Those plugins comes with many default workflows to manage & automate several tasks. Also you may use the default workflows to further customize as per your requirement or create a completely new workflow. For more vCO plugin from different vendors like EMC, F5 Networks, Avenet, NetApp etc visit the below link and click on "vCO Plug-ins" tab


In this post I will show you how to install new plug-in in vCenter Orchestrator. I will download the EMC ViPR plugin from the above website. First step is to register yourself on this website with your company email

  1. Click on the "Try" button to download the plug-in. It will download the file with .dar extension (EMC-ViPR-vCO-Plugin-2.0.0.0.12.dar).
  2. Now login to the vCenter Orchestrator configuration page by typing -
            https://vCO-ip/fqdn:8283
  1. Now Click on "Plugins" tab and click on browse icon to locate the downloaded plugin and then click on "Upload and Install".
  2. It might take couple of minutes to upload, wait till you get the "plug-in installed".
    It will show "will perform installation at next server startup".
  3. Click on"Startup Options" tab and restart the vCO server service.
  1. Now connect to your vCO using vCO client and click on Workflow Tab. You would see new EMC ViPR workflow library added with so many default workflows.


Similarly you may install any third party plug-ins to expand the capabilities of vCenter Orchestrator. I hope this post was help. 

Sunday, September 28, 2014

Installing and Configuring vCenter Orchestrator Appliance 5.5

The Orchestrator Appliance is a preconfigured Linux-based virtual machine optimized for running vCenter Orchestrator.

The Orchestrator Appliance package contains the following software:

1. SUSE Linux Enterprise Server for VMware, 64-bit edition
2. PostgreSQL
3. OpenLDAP
4. Orchestrator 5.5

As we know vCenter Orchestrator installs silently with the vCenter Server installation in Windows Machine, this is just an alternative for that and could be deployed separately. There is no change in features or configuration maximums. The bundled database PostgreSQL and directory services OpenLDAP is very much suitable for small to medium environments and for bigger environments external database and supported directory services could be configured.   This appliance comes with 90 days evaluation license, which starts when you power on the appliance for the first time, later just import the vCenter Server license to continue using it. Below is the step by step demonstration to install and configure vCenter Server Orchestrator Appliance:

  1. Download VCO appliance and login to the vCenter server.
  1. Click on file and point the VCO applinace.
  1. Confirm OVF details and accept the  license agreement.
  1. Give a name and select the cluster and host.
  2. Select the appropriate Datastore.
  1. Setup the Password (root and configuration) and configure static network setting or leave blank if using DHCP.
  1. Confirm the settings and click on finish to start the deployment.
  2. After successful deployment, appliance shows this:
  3.  The default appliance user name is "root" and Password is "vmware".
  4. Open browser and enter the vCO IP or FQDN name and select the Orchestrator Configuration.
  5. Enter username "vmware" and password "configuration password" created during deploying in step# 6.
  6. Import vCenter Server SSL Certificate, Click on Network>>SSL Trust Manager, enter vCenter Server IP or FQDN and click on import.
  7. Similarly vCenter Server license could be imported by going to the "Licenses" tab. In my case I would continue using the evaluation license.
  8. Click on Plug-ins tab and select the Plug-ins which you need and click on "Apply Changes". Any new plug-in can be installed from the same location.
  9. Now click on Authentication tab, you may continue using LDAP or select "SSO Authentication" from the dropdown menu and enter the vCenter Server SSO details. For this SSO SSL needs to be imported, which can be done as mentioned in step # 12 by adding port number 7444, i.e., SSO_ip/FQDN:7444. After the successful configuration select "vsphere.local Administrators" for "vCO Admin - domain and group".

Important: If you want to use vCenter Orchestrator through the vSphere Web Client for managing vSphere inventory objects, you must configure Orchestrator to authenticate through vCenter Single Sign On.

  1. Click on the "vCenter Server" tab and enter the vCenter Server details to register.

This concludes the configuration of vCenter Orchestrator Appliance and for the rest of the configuration like external Database, customer SSL certification please  refer the below guide
 http://goo.gl/gyDkhl 


Now, you can download the vCenter Orchestrator Client or connect directly by going to the IP address of Orchestrator Appliance. The default username is "vcoadmin" and password is "vcoadmin". Hope this post was helpful.

Friday, September 12, 2014

All about VMware Standalone Converter

As we all know, VMware Standalone Converter is used to convert any Physical Machine to Vmware Virtual Machine on the go.  It gives lot of options during conversion where you can shrink the current hard drive, stop or disable the services after conversion, synchronize and lot more. I will try to cover most of the features in this post. This can be installed on Windows XP or later (32 or 64 bit), Windows 2003/2008 (32 & 64 bit) and Windows 2012 (64-bit). The latest version is Standalone Converter 5.5, first let me start with what all Vmware converter can convert

  1. Physical Machine running Windows, RHEL, SUSE, Ubuntu.
  2. Vmware Virtual Machine (.vmx), Vmware Consolidated Backup (.vmx)
[Vmware Infrastructure VM, Workstation, Fusion, Player or other Vmware Products or image]
  1. Microsoft Virtual PC or Virtual Server Virtual Machine (.vmc)
  2. Symantec LiveState Recovery Image (.sv2i)
  1. Acronis True Image Backup (.tib)
  1. StorageCraft ShadowStor (.spf)
  1. Parallels Virtualization Products (.pvs)
  2. Hyper-V Virtual Machine
  3. Redhat KVM Virtual Machines

The destination can be ESXi host or vCenter, the number of source disks is limited to 27 for ESX and to 23 for ESXi hosts, when destination is selected as vCenter.

Configuration Options During Conversion:

  1. Copy Type:
Shrink Hard Drive volumes, Thin or Thick Disk, Cluster size (4KB Default - Block Level) or even a new Virtual Disk can be added.

  1. Devices:
Memory, CPU and Disk Controller can be edited here.

  1. Networks:
VM networks can be edited here.

  1. Services:
Source machines and destination VM's services can be edited here.

  1. Advanced Options:

  1. Synchronization:
This is an amazing feature where you get the option to synchronize the data changes after conversion. You can keep on synchronizing till you get the time for switch over from physical to virtual. Important point here is to disable the option "Perform Final Synchronization". When you use this feature "synchronization", a snapshot is created to the converted virtual machine on vSphere.

Currently there are some limitation with synchronization as mentioned below but workarounds are always available

  1. You can perform only volume-based cloning on the block level for ReFS-formatted volumes (Windows 2012).
  2. Windows Server 2008 sources with FAT/FAT32 volume file system not supported, requires at least one NTFS formatted volume.
  3. Resizing cluster size or shrinking NTFS not supported.

  1. Post Conversion:
Options are self explanatory.

  1. Throttling:

CPU and Network bandwidth can be throttled for the task for resources.