The main objective here is to create an Application which will be deployed on top of supported operating system. Below are list of all the sub-objectives
· Create an Application according to a deployment plan


· Create an Application according to a deployment plan
· Add Application Versioning
· Model and Configure an Application Blueprint
· Delete an Application Version
· Configure an Application blueprint according to a deployment plan
· Create an Advanced Blueprint with Application Services
· Create an Artifact Repository specification
· Create/Map an Artifact specification
· Deploy an Application with Artifacts
· Publish and Entitle an Application to the vRealize Automation Service Catalog
I would cover the first objective here and rest of the objectives in coming posts but "Create an Application according to a deployment plan" is the main one under the section 7.1
Before we start, we need to make sure your Application Services is ready with
1. Cloud Providers
2. Deployment Environment
3. Logical Template
4. Respective Services for Application
1, 2 and 3 are covered here and 4th one on this post
Create a Service
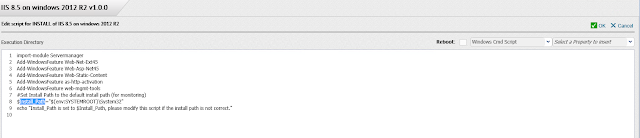
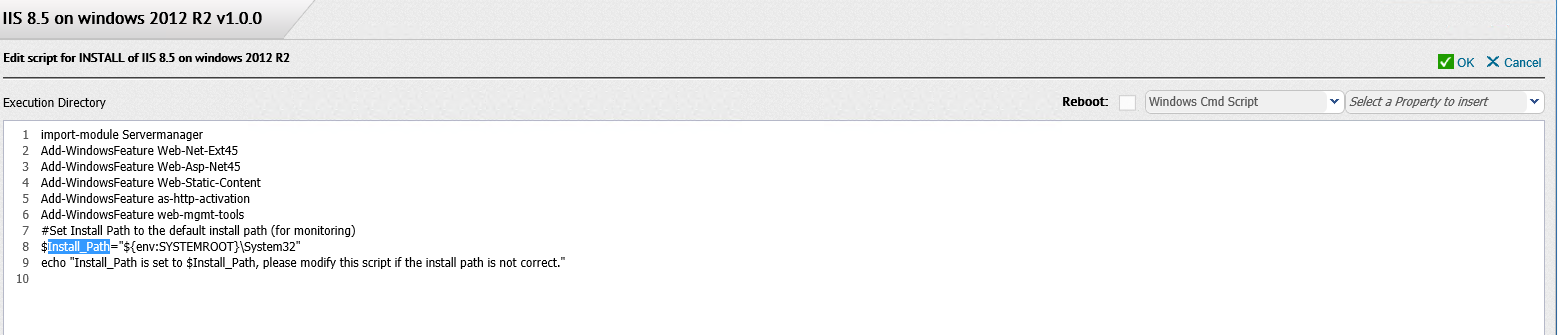
I would be creating a Service for Microsoft IIS 8.5 which will be configured on Server 2012 R2.
1. From the drop-down menu, select Services and click on the green plus to create a new Service.


2. Enter the descriptive name and select the appropriate Business Group
3. Click on Green plus for Service Version and this opens up the form which has lots of information

a. Tag = Nature of Service, in my case Web Services. These will be sorted in Canvas while creating the Application.
b. Supported Components = Depends on OS, Application and nature of script. In my case it would be just PowerShell script, so I would just select Script. similarly EXE, MSI if i have to run a setup file.
c. Supported OSes = Supported OS for application, in my case Windows Server 2012, add all the Supported OSes as much you can so that this Service could be used with those many OSes

d. Properties = The variables which you define in the script. In my case there is only one Install_Path as I am installing only Server feature. You could use Username, password or any variable which you want to pass as an input during the request. Depending on the type of Property, you can decide Required, Secured and Override. This would be Application Services's form which will replace the regular vRA request form once it is published.

e. Actions = Here you define the Lifecycle stages of the Application. i,e., Install, Configure, Start, Update, Rollback and Teardown. Currently it supports Windows cmd, Windows PowerShell and BeanShell script. In my case I would just use Install stage and copy my PowerShell script. Script Type is set to Windows PowerShell script.

Notice the Properties defined in the script Install_Path
Create an Application Blueprint
Now comes the cool part of this tool, building your application
1. From the drop-down menu select the Applications and click the Green plus to create a new application. Give a Name, select the Business Group and click on Save


2. Click on Create Application Version and its comes with 1.0.0 version. Add the description and click on save


3 Now click on Create Blueprint which brings up the canvas

4. Drag and drop the VM template which is sorted as per the Tag you added in the earlier stage (create a service stage). You can modify the CPU, Memory and add description for the VM


5. On bottom right side you would have the list of all Services, we "created IIS 8.5 on windows". Drag and drop it on the VM box

6. Review the Properties and click on Save. Now your new application will appear along with other applications.
This completes the Application Blueprint creation. In the next blog I will show how to Publish and Deploy this Application. There is lot you can do with the Services, External Services and Canvas, also integration with Puppet, manifests and much more, I will see if I get a chance to share some posts on advanced configurations. For now we are ready to deploy our first application.
No comments:
Post a Comment