In this objective, I will cover the first 3 sub-objectives
· Assign a user the necessary permissions to gain access to Application Services
· Install and set up the Application Services virtual appliance
· Configure Application Services to use a proxy

· Assign a user the necessary permissions to gain access to Application Services
· Install and set up the Application Services virtual appliance
· Configure Application Services to use a proxy
· Assign a user the necessary permissions to gain access to Application Services
1. Login to vRA and go to Administration > Users & Groups > Identity Store Users & Group and on top right Search bar, enter the account name to which you wish to provide necessary permissions


2. Click on the name and you are presented with "Add roles to this user" option on the right side

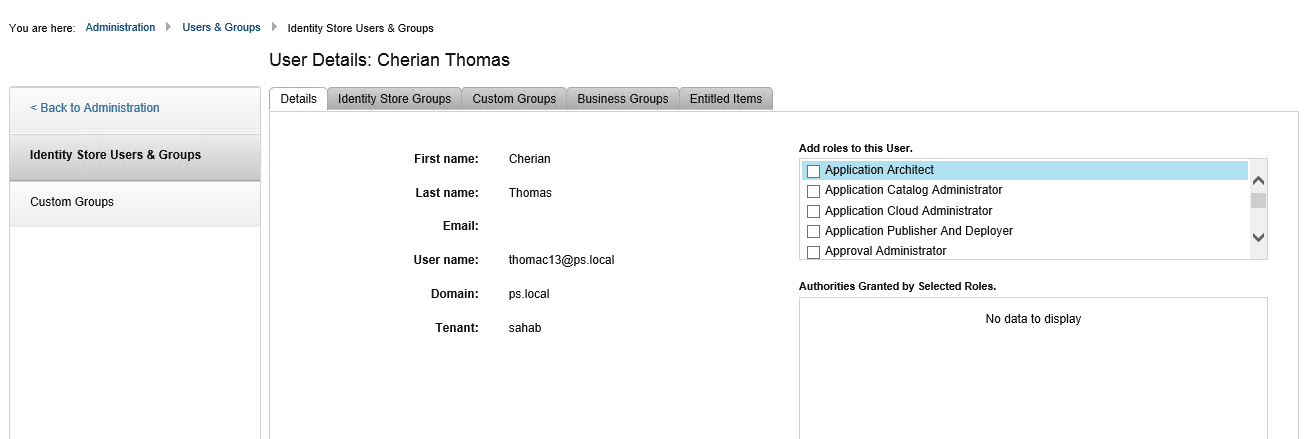
a. Application Architect


b. Application Catalog Administrator


c. Application Cloud Administrator


d. Application publisher and Deployer


I would add all 4 roles to one master user if there it is the main user. After selecting the roles click on Update to save.
Install and set up the Application Services virtual appliance
I have already posted about this and you could find it here. Deploying the Application Services Appliance is straight forward as any other vSphere Appliance. Before you deploy the Application Services appliance, make sure you have created the IP Pool at the Datacenter level and associated the right Network Pool.
Configure Application Services to use a proxy
VMware documentation
Even if you use Application Services only to deploy applications in a private cloud, some deployments might require access to URLs from outside the corporate firewall. For example, an action script might involve downloading application bits from an open-source Web site. You can configure Application Services to use a proxy for these cases.
Note: In my lab, I am not using proxy, but are the steps needed to configure proxy settings
1. Login to vRealize Application Service appliance as a darwin_user and switch user to root


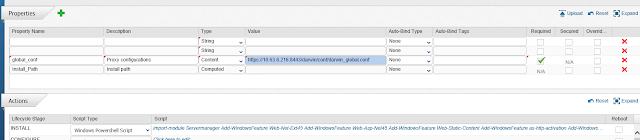
2. Open the below configuration file and update the proxy IP and port information and save the file
/home/darwin/tcserver/darwin/webapps/darwin/conf/darwin_global.conf


Note the warning in the screenshot.
3. Update the Services to use proxy, add a property with the name 'global_conf' of type 'Content' and define the value as https://DarwinServerIP:8443/darwin/conf/darwin_global.conf
a. Login to Application Services, from the drop-down select Services and open the Service which you need to add proxy configuration


b. Click on Edit and add the property as per the screenshot
c. Update the Services to use proxy, add a property with the name 'global_conf' of type 'Content' and define the value as Add the following lines to the beginning of each action script for the service that requires a proxy:

# Import global conf
. $global_conf
d Save the service.
No comments:
Post a Comment